2 Installation
3 Introduction
This chapter will guide you through configuring Claude Desktop to connect with MCP servers. By the end, Claude will have access to powerful tools for data analysis, optimization, and more.
We’re telling Claude Desktop which programs (MCP servers) it should start and connect to. This is done through a simple configuration file.
3.1 Prerequisites
Before starting, ensure you have:
| Requirement | Description |
|---|---|
| ✅ Claude Desktop | Latest version installed |
| ✅ MCP Servers | Installed via Querex Installer |
| ✅ Power BI Access | Premium capacity workspace access |
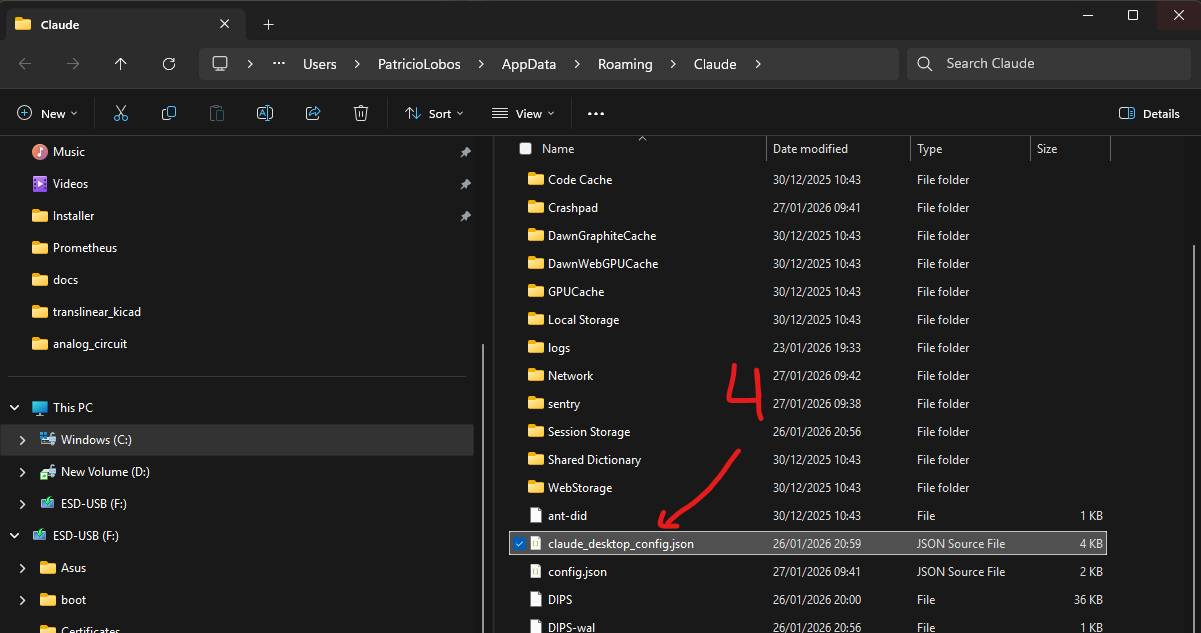
4 Finding the Configuration File
Claude Desktop stores its configuration in a JSON file called claude_desktop_config.json. Let’s find it.
4.1 Method 1: Via Claude Desktop (Recommended)
Use Claude Desktop’s built-in settings to open the configuration file.
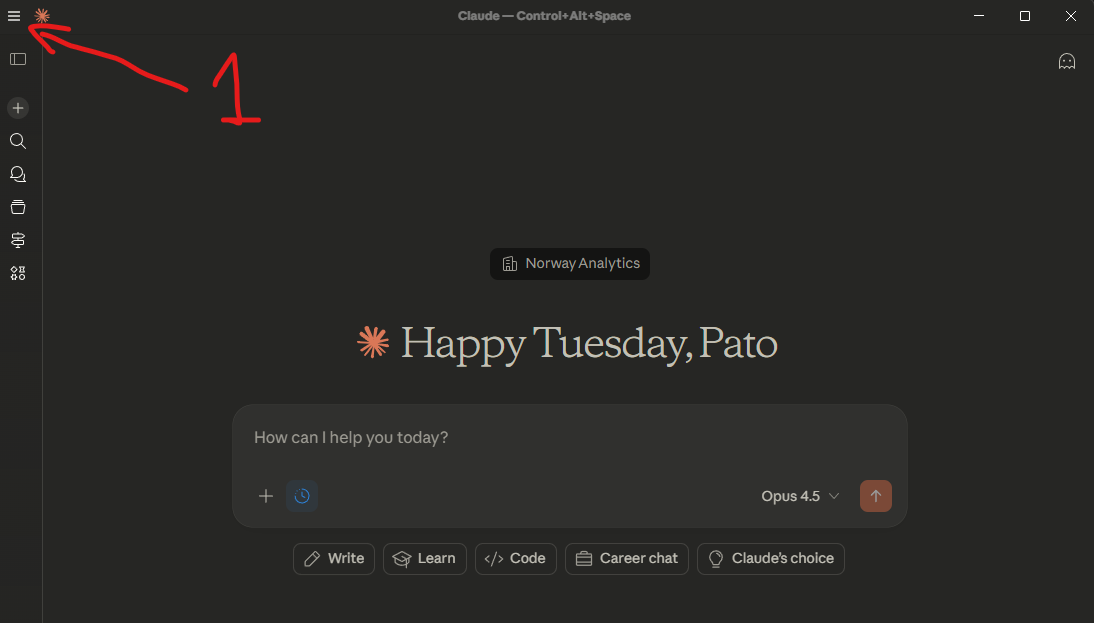
1 Open Claude Desktop
Start Claude Desktop as you normally would.
2 Open Settings
Click the hamburger menu (☰) in the top-left corner, then select Settings.
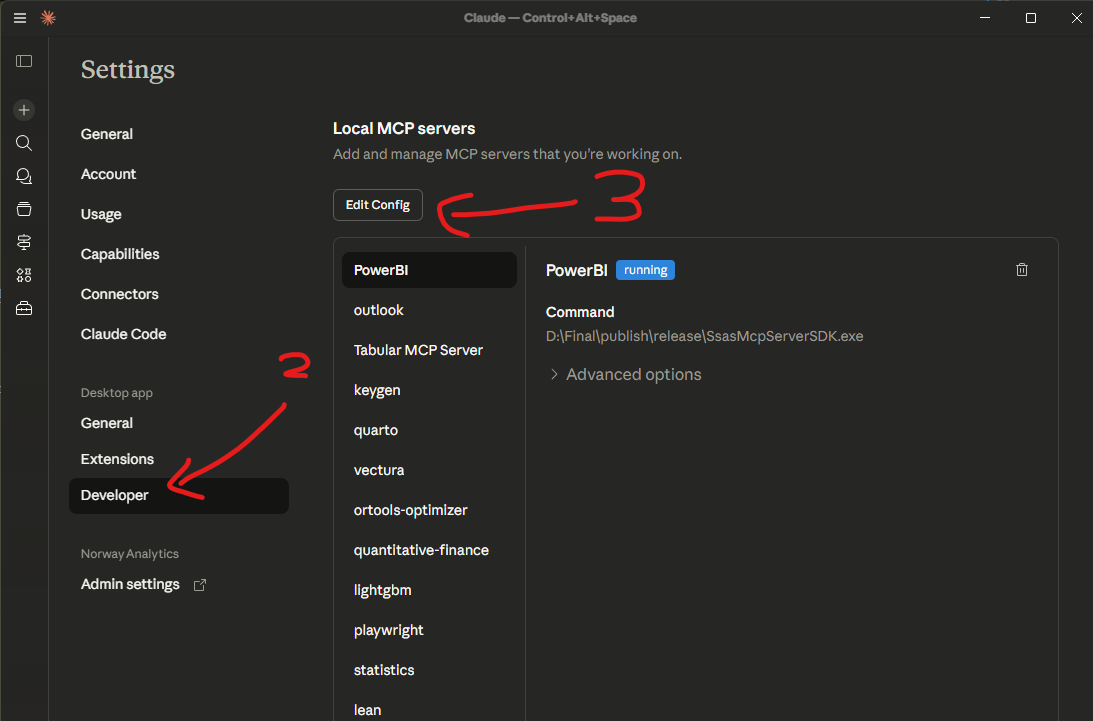
3 Go to Developer Tab
In the Settings window, click Developer in the left sidebar.
4 Click “Edit Config”
Click the “Edit Config” button to open the configuration file.
5 Understanding JSON Format
The configuration file uses JSON format. Don’t worry — it’s simpler than it looks!
5.1 Basic Structure
claude_desktop_config.json
Let’s break it down:
| Element | Explanation |
|---|---|
{ } |
Curly braces mark the start and end of a group |
"mcpServers" |
The main section where all servers are defined |
"server-name" |
A friendly name you give the server |
"command" |
The path to the program to run |
"args" |
Extra arguments for the program (often empty []) |
"env" |
Environment variables the server needs |
- Missing comma: Every element needs a comma after it, EXCEPT the last one
- Wrong quotes: Always use straight
"not curly ” ” - Backslash: In Windows paths, use double backslash
\\or single forward slash/
6 Adding the MCP Servers
Now for the important step! Copy the configuration below and paste it into your file.
Windows Configuration
On Windows, the MSI installer registers each license key in the Windows Registry during installation. The servers read their license directly from the registry at startup — so the "env" section stays empty.
claude_desktop_config.json
{
  "mcpServers": {
    "PowerBI": {
      "command": "C:\\Program Files\\Norway Analytics\\SSAS MCP Server SDK\\SsasMcpServerSDK.exe",
      "args": [],
      "env": {}
    },
    "ssb": {
      "command": "C:\\Program Files\\Norway Analytics\\Nordic Statistics MCP Server\\mcp-ssb.exe",
      "args": [],
      "env": {}
    },
    "statistics": {
      "command": "C:\\Program Files\\Norway Analytics\\MCP Stats\\MCP_Stats.exe",
      "args": [],
      "env": {}
    },
    "ortools-optimizer": {
      "command": "C:\\Program Files\\Norway Analytics\\OR-Tools MCP Server\\LP.OrToolsServer.exe",
      "args": [],
      "env": {}
    },
    "igraph": {
      "command": "C:\\Program Files\\Norway Analytics\\MCP Igraph\\IgraphMcp.exe",
      "args": [],
      "env": {}
    },
    "quantitative-finance": {
      "command": "C:\\Program Files\\Norway Analytics\\Quantitative Finance MCP Server\\ConversationalFinanceMCP.exe",
      "args": [],
      "env": {}
    },
    "lightgbm": {
      "command": "C:\\Program Files\\Norway Analytics\\LightGBM MCP Server\\LightGbmMcpServer.exe",
      "args": [],
      "env": {}
    }
  }
}
macOS does not have a central registry like Windows. Instead, each server’s license key must be passed as an environment variable directly in the configuration file. This is the "env" section — think of it as handing each server its ID badge at startup.
On macOS, you must include your license keys in the "env" block for each server. Without them, the servers will not start. Replace the placeholder keys below with the ones you received after purchase.
claude_desktop_config.json
{
  "mcpServers": {
    "Power_BI": {
      "command": "/Library/Application Support/Norway Analytics/Power BI MCP Server/SsasMcpServerSDK",
      "args": [],
      "env": {
        "SSAS_LICENSE_KEY": "YOUR-LICENSE-KEY-HERE"
      }
    },
    "ssb": {
      "command": "/Library/Application Support/Norway Analytics/Nordic Statistics MCP Server/mcp-ssb",
      "args": [],
      "env": {
        "SSB_LICENSE_KEY": "YOUR-LICENSE-KEY-HERE"
      }
    },
    "statistics": {
      "command": "/Library/Application Support/Norway Analytics/MCP Stats/MCP_Stats",
      "args": [],
      "env": {
        "MCP_STATS_LICENSE_KEY": "YOUR-LICENSE-KEY-HERE"
      }
    },
    "ortools-mcp-server": {
      "command": "/Library/Application Support/Norway Analytics/OR-Tools MCP Server/LP.OrToolsServer",
      "args": [],
      "env": {
        "ORTOOLS_LICENSE_KEY": "YOUR-LICENSE-KEY-HERE",
        "GOOGLE_MAPS_API_KEY": "YOUR-GOOGLE-MAPS-KEY-HERE"
      }
    },
    "igraph": {
      "command": "/Library/Application Support/Norway Analytics/MCP Igraph/IgraphMcp",
      "args": [],
      "env": {
        "MCP_IGRAPH_LICENSE_KEY": "YOUR-LICENSE-KEY-HERE"
      }
    },
    "quantitative-finance": {
      "command": "/Library/Application Support/Norway Analytics/Quantitative Finance MCP/ConversationalFinanceMCP",
      "args": [],
      "env": {
        "QUANT_LICENSE_KEY": "YOUR-LICENSE-KEY-HERE"
      }
    },
    "lightgbm": {
      "command": "/Library/Application Support/Norway Analytics/LightGBM MCP Server/LightGbmMcpServer",
      "args": [],
      "env": {
        "LIGHTGBM_LICENSE_KEY": "YOUR-LICENSE-KEY-HERE"
      }
    }
  }
}| Windows | macOS | |
|---|---|---|
| License storage | Windows Registry (set during install) | Environment variable (set in config) |
| Binary path | C:\Program Files\Norway Analytics\... |
/Library/Application Support/Norway Analytics/... |
| File extension | .exe |
No extension |
| Config file location | %APPDATA%\Claude\ |
~/Library/Application Support/Claude/ |
On Windows, the installer takes care of license activation for you. On macOS, you are the installer — the "env" block is where you present your credentials.
6.1 Server Overview
| Server | Purpose | Key Features |
|---|---|---|
| Power BI | Query semantic models | DAX queries, model metadata |
| Nordic Statistics (SSB) | Official Nordic statistics | Data from SSB, SCB, Statistics Finland, Denmark, Iceland |
| MCP Stats | Statistical analysis | Regression, hypothesis testing, Bayes |
| OR-Tools | Optimization | Linear programming, routing, scheduling |
| iGraph | Graph analysis | Centrality, communities, visualization |
| Quantitative Finance | Financial math | Options, bonds, portfolios |
| LightGBM | Machine learning | Gradient boosting for classification, regression, ranking |
7 Save and Restart
1 Save the File
Press Ctrl+S to save.
2 Completely Close Claude Desktop
You must close Claude Desktop completely — not just minimize the window.
- Windows: Right-click the Claude icon in the system tray (bottom-right near the clock) and select Quit.
- macOS: Right-click the Claude icon in the Dock and select Quit, or use ⌘+Q.
3 Restart Claude Desktop
Open Claude Desktop again.
4 Verify Servers are Active
Look for the 🔨 icon (hammer) in the bottom-right of the text input:
Click the hammer to see available tools.
8 Test the Connection
Let’s verify everything is working! Try typing this in Claude:
If configured correctly, Claude will:
- Request permission to use the MCP servers
- List all available tools from each server
- Show you the capabilities at your disposal
If you see the tools listed, you’re ready for the next chapter!
9 Next Steps
Now that your environment is set up, proceed to Chapter 2: Understanding MCP to learn about context windows, best practices, and choosing the right tools.